Tag Archives: kitchen

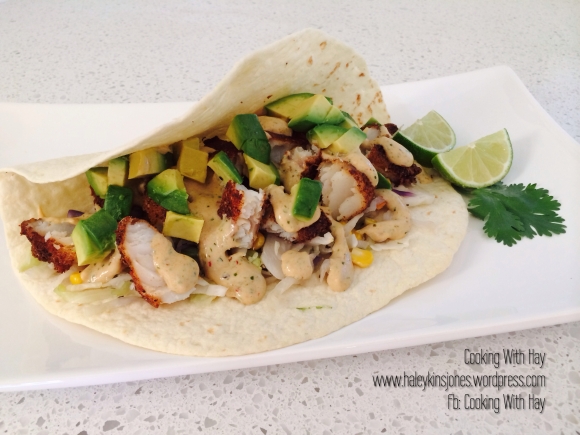
Blackened Fish Tacos with Chipotle Cilantro Dressing (salmon or cod or whichever fish you want)

Finally, this post is done. I still consider myself a beginner food blogger even though this blog has recently had it’s 3rd anniversary. Blogging recipes takes work. Writing an accurate recipe takes work. It’s work but it’s work I enjoy. I just wish I could do nothing but cook, take pics, and blog… Haha True story.


Been talking about these a lot, I know, I apologize for the redundancy. Finally got all the components together….

You’re going to need to check out my last 2 posts!
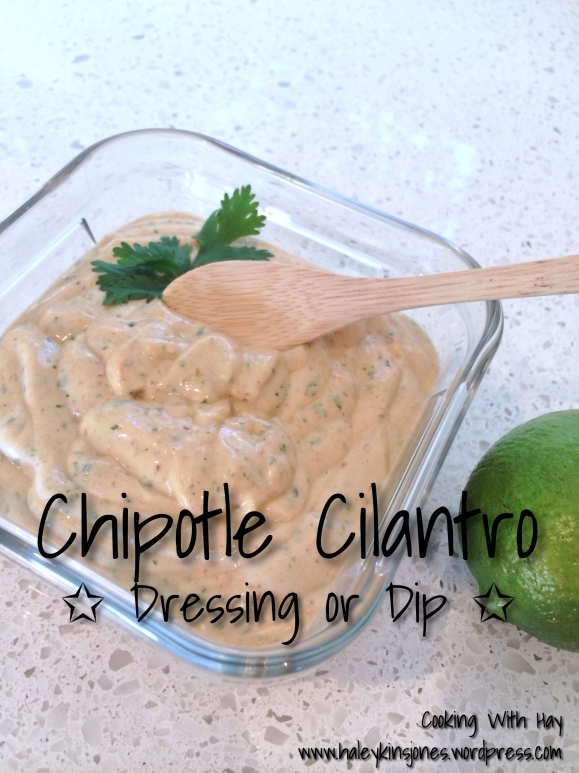
Click this photo to get this recipe!

Click on the photo to the left to get this yummy Chipotle Cilantro Dressing recipe for these Blackened Fish Tacos that we’re about to make.
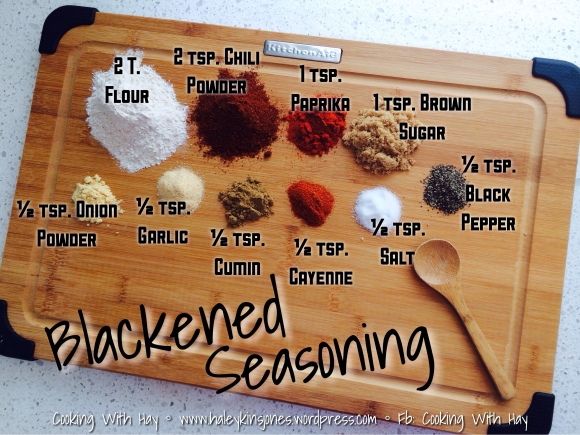
Click this photo to get this recipe!

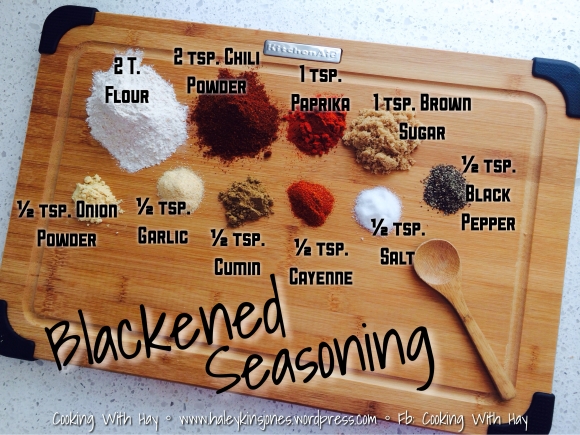
Click this photo to see the ingredients needed to make the Blackened Seasoning that will crispify (is that a word?)the fish to a nice golden crunch on the outside and give it a deep savory flavour.


BLACKENED FISH TACOS
♥ 2 BAGS COLESLAW
♥ 1½ C. CORN KERNELS
♥ SALT + PEPPER
♥ FLOUR TORTILLAS
♥ 1 BIG SALMON FILET or 4 LARGE COD FILETS
♥ HIGH SMOKE POINT OIL FOR FRYING (i used Canola Oil)
1 BATCH OF BLACKENED SEASONING
1 BATCH OF CHIPOTLE CILANTRO DRESSING
♥ AVOCADO, FRESH, CHOPPED
♥ CILANTRO + LIME FOR GARNISH

Saute the coleslaw and corn with salt and pepper until just tender.
Set aside, but keep warm.
Heat oven to low temp and slowly warm the tortillas. I like em just before they get toasted.
Cut salmon or fish into large pieces suitable for frying.
Heat oil, just above medium, not too hot or the fish won’t cook thoroughly and not too cold or the fish will soak up to much oil and become soggy.
Fry till dark and golden on each side.
If you’re using salmon you may have to do the ends too. Use tongs. They work best.
When they are done gently remove from hot oil onto a papertowel lined dish to remove excess oil.
Let cool for about 5 minutes and break into good chunks.

THE ASSEMBLY
Warmed Tortilla
Sauteed slaw and corn
Blackened fish
Drizzle with some Chipotle Cilantro Dressing
Top with chopped fresh avocado, cilantro and a squeeze of fresh lime juice


Place the Blackened Seasoning in a shallow flat bottom container of some sort so you can press the fish into it.  Coating every inch of it.  The better it’s coated the better the crisp.
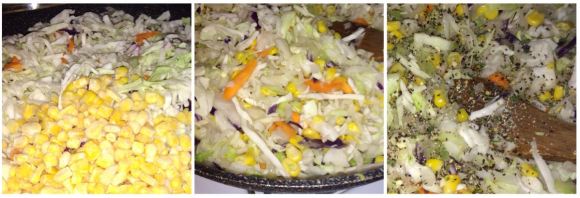
You don’t want to over cook the cabbage, or it will lose all it’s structure.  You want to saute it till it just starts to wilt.  Keeping it warm will also allow it to keep cooking so with the pan on medium heat, just keep an eye on it.
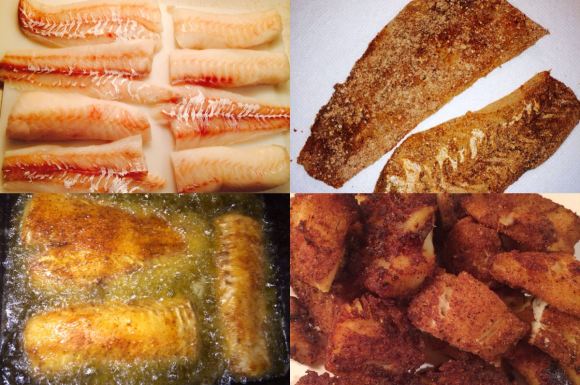
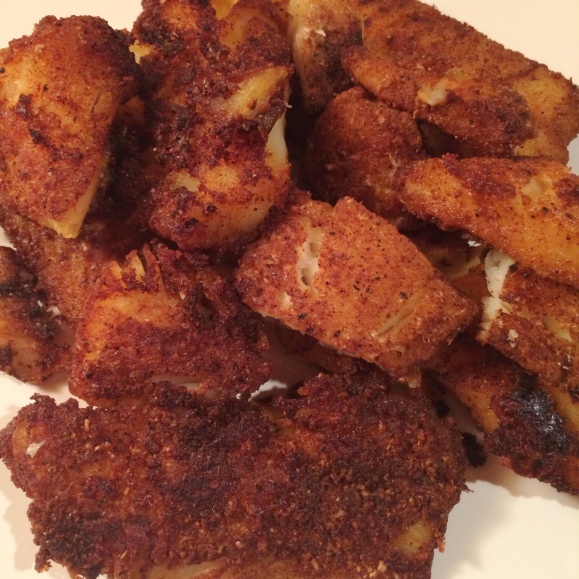
This is the cod I used last night.  Seasoned all over every surface of fish with the Blackened Seasoning.

Fried in some oil till golden and delicious. I use a large cast iron flat bottom deep dish for frying. Allows maximum room for the fish to fry properly without over crowding the pan.   The heavy duty cast iron can withstand the high temperatures and will maintain it’s heat better when you drop in the fish.

I fried the fish in 2 batches to ensure it cooked evenly and properly. Or you can use a deep fryer but I’ve only used one once and I didn’t like it…. it was too small for what I needed and I don’t want a big greasy appliance kicking around here. I fry as little as possible.
Frying foods took a lot of practice for me over the years.  So many times chicken or potatoes or whatever it was I was cooking, was either undercooked or well well well done. Practice makes perfect.

Frying can be very unhealthy if done incorrectly.  When done the right way you are using the least amount of oil to get that desired crunch and crispiness.

✰ Oil thats too hot will scortch the food on the outside while leaving it raw inside. ✰

✰ Oil that isn’t hot enough won’t seal the food as it should when you drop it in. ✰

(Rather it will sit and soak up the oil.  This results in that drippy soggy mess we’ve gagged on one too many times.

The first time I made these I used some fresh plump salmon and they were to die for! This time around i used cod. I preferred the salmon over any white fish but both were really good.


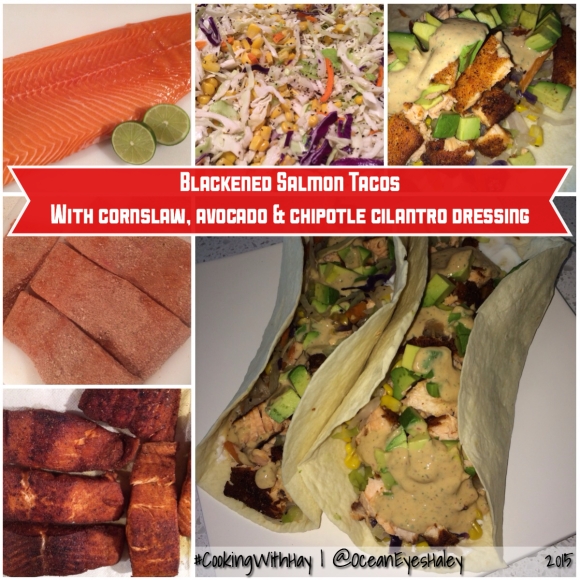
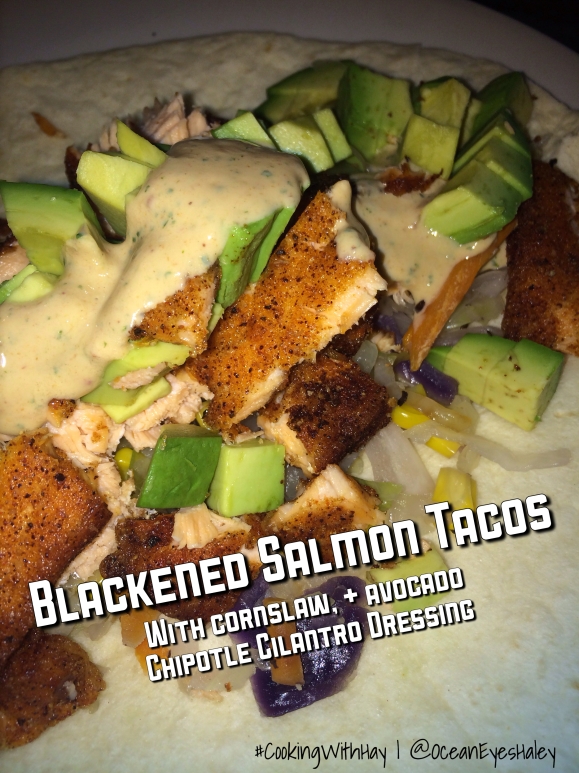
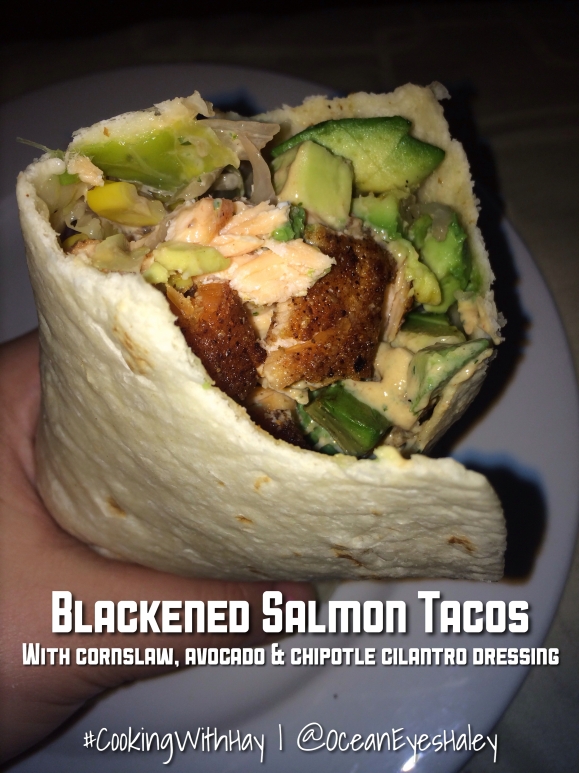
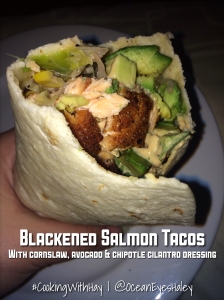
BLACKENED SALMON TACOS

Here are some pics from the salmon ones I made last week!  These ones were my favourite!

Since the photos were taken down in my temporary basement dungeon kitchen they aren’t of the greatest quality.  We can only go up from here my friends ☺

1603

❤️ Thanks for visiting, if you liked this blog please click LIKE below. If you want to follow my blog please scroll to the bottom, click the FOLLOW button and enter in your email address.
Love Haleykins❤️
**Please click “OLDER POSTS” button, (bottom of the page)
or the “COOKING WITH HAY” tab (top of the page) to see more**
Tagged , , , , , , , , , , , , , , , , , , , , , , , , , , , , , , , , , , , , , , , , , , , , , , , , , , , , , , ,

Blackened Seasoning

Hi guys, I posted some pics of the Blackened Salmon and Blackened Fish Tacos to my Cooking With Hay Facebook page, and the requests came in for the recipe. As well as the request for me as your personal chef. Thank you for that! It actually is much easier to make the food than to blog the recipe… just in case you were curious. LOL so much time spent running a photoshoot and a kitchen at the same time. I love it tho and anxious to spend more time doing it. The balance between stoning the front of the fireplace and installing bathroom sinks… or blogging…. its a tough one….

I’m quite pleased with the photos from recent photoshoots. I’m working partially upstairs while I can get the good natural daylight and partially still down in the dungeon, errr, I mean, basement. Natural daylight makes for much more appetizing food pics. Less shadows and more true to life colouring of these meals. After all, we taste with our eyes and our noses before the food even hits our tongue or tummies.


I’ve laid out all the ingredients that I used to make the Blackened Seasoning, on this fancy bamboo KitchenAid cutting board that Hubby came home with for me! *SMILES* This is the seasoning for the Blackened Salmon Tacos and Blackened Fish Tacos that I’ve been mentioning. (Blog posts to follow guys!)

I pulled this from a website a while back, I haven’t altered anything except that I use whole wheat flour instead of white flour. It actually just adds to the crispy factor we’re going for here! Yummy


Don’t confuse T (tablespoon) for TSP (teaspoon)!!
Oh come on, like you haven’t done that before.

The original image said 2 T. Chili Powder… LOL its got to be 2 TSP. Teaspoons
I made the same error when I first made Butter Chicken. That was a hot hot hot meal. Great tho. Just a real kicker that’s for sure.

BLACKENED SEASONING

♥ 2 T. FLOUR (I use whole wheat)
♥ 2 TSP. CHILI POWDER
♥ 1 TSP. PAPRIKA
♥ 1 TSP. BROWN SUGAR
♥ ½ TSP. ONION POWDER
♥ ½ TSP. GRANULATED GARLIC
♥ ½ TSP. CUMIN
♥ ½ TSP. CAYENNE
♥ ½ TSP. SALT
♥ ½ TSP. PEPPER

Mix together well. Store in an air tight container.


↓ This made enough to do a big slab of salmon or 4 large cod fillets. If you’re doing more you may want to double this recipe. Or to save you some prep time on the next go around, make up a big batch now.

↑ I made one batch of this seasoning and mixed it in this shallow plastic container. All ready to go so I can just lay the piece of fish or meat or whatever it is that you’re going to use, onto the seasoning.
This works great for everything, even prawns and scallops. Try it out and I hope you like it.  I’ve made it 3 times this July.  Cuz it’s that good.  LOL yum!


Blog Post with recipe and pics COMING SOON!

Blog Post with recipe and pics COMING SOON!

Blog Post with recipe and pics COMING SOON!

Blog Post with recipe and pics COMING SOON!

Blog Post with recipe and pics COMING SOON!

Blog Post with recipe and pics COMING SOON!


❤️ Thanks for visiting, if you liked this blog please click LIKE below. If you want to follow my blog please scroll to the bottom, click the FOLLOW button and enter in your email address.
Love Haleykins❤️


**Please click “OLDER POSTS” button, (bottom of the page)
or the “COOKING WITH HAY” tab (top of the page) to see more**


Tagged , , , , , , , , , , , , , , , , , , , , , , , , , , , , , , , , ,

Oriental Salad

I’m getting back into the swing of food blogging…. Hard to believe that besides these last 3 posts…. the last one was in May or 2014!!!  Wow…

Oriental Salad – This is a fantastic salad that I remember my mom making back when I lived at home.  Back when I had no taste buds or basically didn’t like food or flavour…. boy…. all those wasted years… ugh!!!  What was wrong with me?  Why! Why! Why! 

Popped my mom an iMessage and asked her for her recipe… I wanted something to go with my Chicken Satay with Coconut Peanut Thai Sauce, and a traditional coleslaw just didn’t seem up to par for this dish.   She hit me back with the deets and I went shopping!  I had never before purchased bean sprouts so that was number one on my list.  Always excited to buy new things… yea I know, as if I’ve never bought bean sprouts, LOL ___________________________________________________

ORIENTAL SALAD

• 1 BAG COLESLAW MIX

• 1 BAG BEAN SPROUTS

• SLICED GREEN ONION

SLICED MUSHROOMS (fresh)

• CHICKEN FLAVOURED ICHIBAN SOUP (uncooked, reserve seasoning pack for dressing)

• CHOW MEIN NOODLES (uncooked)

• TOASTED SESAME SEEDS

• TOASTED SUNFLOWER SEEDS

TOASTED SLIVERED ALMONDS

This makes a lot of salad!  If it’s for a smaller group or if you plan on eating it for a few nights, only make up what you’lll use for that night as it doesn’t make very good leftovers…. (soggy noods…😩)

Toss all the ingredients in your salad bowl, use as little or as much of each as you want.  We like less noodles, and lots of veggies and seeds.  I actually didn’t even use chow mein noodles when I made mine.  Still just as good… less crunch I suppose. 😜

___________________________________________________

DRESSING

• SEASONING PACKET FROM ICHIBAN SOUP

• 1/2 CUP OIL

• 4 TABLESPOONS SOY SAUCE

• 3 TABLESPOONS VINEGAR

• 1 TABLESPOON SUGAR

• SALT AND PEPPER

Combine all ingredients into a jar and give it a good shake.  Only use as much as you need for the night, as mentioned above, this makes a large salad.  If you’re making a smaller salad you may want to half this dressing recipe.  You don’t want soggy noods…

 Thanks Mommy, for another good recipe!  I will be making this scrumptious one again soon I know it.  Doesn’t it look pretty with the little pops of colour from the coleslaw mix 😜  Serve it up along side something yummy for your tummy and enjoy this bowl full of goodness.❤️ Thanks for visiting, if you liked this blog please click LIKE below. If you want to follow my blog please scroll to the bottom, click the FOLLOW button and enter in your email address. 

Love Haleykins 20131230-210222.jpg

**Please click OLDER POSTS, {below} to see more** ❤️


Tagged , , , , , , , , , , , , , , , , , , , , , ,

BAKED TURKEY & SPINACH MEATBALLS

Hello Everyone. Since adding a Facebook Page, Cooking With Hay, {please come by and LIKE my page} I have some more followers this time around and I just wanted to take this opportunity to say ‘Hello and Thank You’
I appreciate every single one of you, and any LIKE or SHARE that you can throw my way as well. You keep this fun for me.

**please look for the buttons that say previous posts or older posts to see more or use the categories at the top or the archives and links at the bottom to get around a little easier. Also look for the search bar near the bottom to make it even more easier**

In just 10 days Hubby and I will be off to Nuevo Vallarta, Mexico. If you’re on my personal FB, you’re most likely annoyed with my daily countdown photos… sorry about that. I’m just super excited! The point to this rambling… I’ve been trying to empty out the freezer before we go. Don’t ask me why, because I don’t have an answer. 😜 One of the last few things In the freezer was 2 lbs of extra lean ground turkey breast!! Awesome. I bought this for one purpose and one purpose only…. our favorite meatballs, Baked Turkey & Spinach Meatballs to be exact! So lean, so good! I will serve these with some turkey gravy, garlic mashed potatoes made with no butter or milk. {I use chicken stock, salt and garlic} and sweet corn.
You may remember an older post about these meatballs, but it didn’t contain any pictures and I’ve since jacked up the spinach and the seasonings a bit. I hope you like this new tweek!

20140214-142826.jpg
BAKED TUREY & SPINACH MEATBALLS

INGREDIENTS:

  • 2 tablespoons olive oil
  • 1 large onion, finely chopped
  • 2 garlic cloves, finely minced
  • 1 teaspoon salt
  • 1/2 teaspoon ground black pepper
  • 1/4 teaspoon dried thyme leaves
  • 1/2 teaspoon dried oregano
  • 1/4 – 1/2 teaspoon crushed red pepper flakes (optional – adjust to your preference)
  • 2 x 16 oz pkg. frozen chopped spinach (defrosted, drained, and squeezed to remove excess water)
  • 2 tablespoons Worcestershire sauce
  • 1/3 cup chicken broth
  • 2 1/2 lbs lean ground turkey
  • 1 cup bread crumbs, {I make my own from the loaf ends if my favorite 12 grain bread.
  • 2 large eggs

 
INSTRUCTIONS:

  • Preheat oven to 400 degrees F. Prepare a large baking sheet by spraying with cooking spray.
  • In a frying pan on medium heat, heat olive oil until hot. Then add onion, garlic, salt, pepper, thyme, oregano, and red pepper flakes. Sauté until onion is tender.
  • Add spinach to pan and combine with onion mixture. Add Worcestershire sauce and chicken broth and mix well to combine. Cook until most of the liquid has cooked out. Remove from heat and allow to cool to room temperature.
  • In a large bowl, combine the turkey, bread crumbs, and egg. Add cooled onion/spinach mixture to the meat.
  • 5. With your hands, create meatballs that are about 1 – 1 1/2 inches in diameter and place them on the baking sheet. Leave a little bit of space between each meatball. When you are done shaping your meatballs, you will probably have about 40-42 meatballs from this recipe. If you don’t need this many, you can freeze them after baking or cut this recipe in half.
  • Bake until your meatballs are cooked through with an internal temperature of 160 degrees F – which was about 20 minutes for my oven. Remove from oven and serve as desired.

 
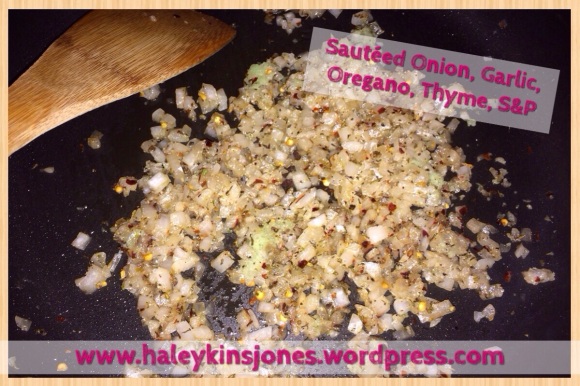
20140214-142852.jpgOne my favourite smells is onions in a frying pan. Adding in the garlic and seasonings and you are suddenly transported to a very happy happy land. Haha. Ok it’s good, but maybe not that good… No, it IS that good!!

20140214-142839.jpgWhen they are done they are golden and smell divine. Here’s the before and after!
20140214-142901.jpgHa! I’m supposed to freeze some if these. Dude, by the time we are finished with these, there won’t be enough to bother freezing!!

20140214-142912.jpgLike I said ,way back there up above, I served these with garlic mashed potatoes {no butter, no milk}. I put in 1 Garlic Ball {click this link to make them yourself} add in some salt. I use Sea Salt and some of that leftover chicken stock because I know what you were thinking when you had so much stock left… “What am I going to do with this leftover stock?” {Ok maybe you’re not thinking that, but I’m always trying to use everything. Waste not want not after all.}. So you should still have stock left after the meatballs, and the mashed potatoes so tomorrow morning you can add it to some fresh cut hash brown potatoes in a ‘barely’ oiled hot pan. So you don’t need as much oil! Hahaha! Oh, I got sidetracked…. I also served this with turkey gravy, spiced up with oregano and red pepper flake because I idolize red pepper flake hahaha and sweet juicy corn!

20140214-142925.jpgHere, I used my fork and broke one of these scrumptious meatballs open. I have doubled the amount of spinach originally called for to 2 packages. This ensures lots of Popeye strength, and so much healthy goodness and flavour! Your call. I say use 2 packages of spinach and if it’s too much for you cut it down next time but it’s not like it’s intolerable, I swear, you’ll thank me! Hehe!

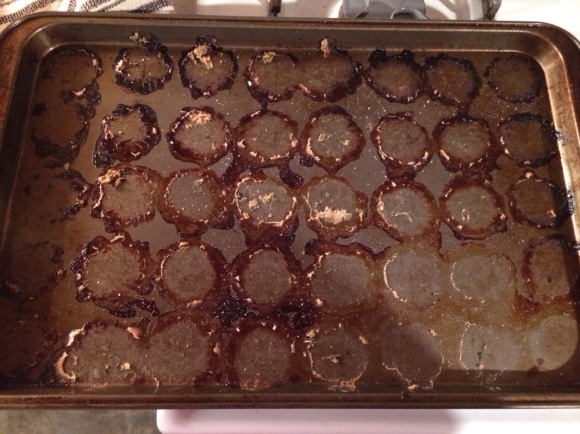
20140214-143048.jpgI thought there would be some sort of drippings in the pan that I could use to make some good gravy but check out this cooking sheet…. Dem are some lean mean healthy machines…. Depending on how much gravy you put on! Another reason to make a shitload of gravy at Christmas time. Freeze it in portions for occasions such as this. I just said ‘shitload’ on my blog. Is that completely inappropriate, it’s just that that seemed like the most appropriate wording. I don’t know. I’m still learning…..

20140214-143059.jpgSeriously hearty, mostly healthy and your tummy will be forever thankful! Please hit me up with a comment below if you make these and what your thoughts were! I love feedback.

Thanks for visiting, if you liked this blog please click LIKE below.
If you want to follow my blog please scroll to the bottom, click the FOLLOW button and enter in your email address.

Love Haleykins
20131230-210222.jpg

**Please click OLDER POSTS, {below} to see more**

Tagged , , , , , , , , , , , , , , , , , , , , , , , , , , ,

Filled my backpack with onions and… french bread

I woke up to sunshine in my eyes, shining through the trees in my back yard. It’s been this way the last few mornings. Absolutely beautiful the way the light dances along the walls and over my perfumes. Another nice day.

However I’ve been feeling “blah” lately. Can I use that, non-word? It really is the best word to describe how I feel. I think it’s because I’ve not been out in that sunshine… so this morning I threw my backpack on and pulled out my bike. It was crisp and the air smelled wonderful. There is definitely a different vibe out there now than there was just a few months ago. School kids here school kids there. There’s a kid, there’s another ok you get it. Even the sun looks different than it did before. I appreciated the change.

On my way back through my neighbourhood I stopped at the local market and filled up my backpack with a bunch of….. onions and a loaf of french bread…. Thankfully the bread fit in my bag so I didn’t have to finish my bike ride with a loaf of bread sticking out the top…. Time to fire up the slow cooker.

Upon purchasing my new slow cooker a few weeks ago, I’ve been filling up my book with new recipes to try. A basic, and one in which I’ve only ever tried twice in my life, caught my eye. French Onion Soup.

Now I’m excited to get this going. I’ve recently had two addictions…. onions and red pepper flakes. I’ve been going through onions like a crazy person gone mad. Luckily I wear contact lenses and thus…. no burning or teary eyes! Yes the rumor is true. Also, red pepper flakes…. why can’t they go in every meal? Give me one good reason why they can’t.  Mmmmmm spicy.

FRENCH ONION IN THE SLOW COOKER

Ingredients

3 Cans beef broth (I prefer Swanson)

3 T butter

2 yellow onions

¾ T sugar

1/3 C cooking sherry

1 t salt

Slices of crusty bread (I used french)

Gruyere Cheese (I had swiss in the fridge)

Directions

Turn slow cooker on to high

Add butter

Slice onions into rings and separate the rings from each other with your hands

When butter is melted add in the onion rings

Toss to coat onions evenly in the butter

Add beef broth, sugar, sherry, and salt

Cook on high for about 7-8 hours or low for about 10

It’s done when the onions are translucent and softened.

To Serve

Set your oven to broil

Toast a slice of bread for each person.

Cut the cheese into slices (My swiss was presliced)

Spoon soup into individual oven safe bowls

Cheese goes on the toasted bread

Float each piece of cheese toast in each bowl.   And hope they fit…

Place bowls of soup and cheese toast on a cookie sheet or baking pan for ease and safety

Put em in the oven under the broiler.

Broil for a few minutes until cheese is melty and slightly golden

Serves 4-6

While I had the butter melting in the slow cooker to start the soup, I started in on the next dish.  So incredibly glad I started this one early as I had no idea, nor did I even begin to think about just how long it would take!  OMG.  I made Beef Pot Stickers to go with Soup.  The filling itself is easy to make…. But it took a very long time to assemble each one.

I love gyoza and always order it when we have sushi..  It becomes the usual with our sushi order.  If you don’t know what gyoza are, well they are basically pork dumplings but I guess they can be made various ways.  They are fried on one side and slightly steamed I believe.  Yum Yum Yum  in my Tum Tum.  These are similar, and although I have not yet fried them up for dinner…. I can’t imagine them not being tasty

BEEF POT STICKERS

Ingredients

2 lbs extra lean ground beef

1 egg white

½ a carrot, finely diced

4 green onions, finely chopped

½ yellow onion, finely chopped

3 cloves of garlic, minced

1 red pepper, finely chopped

3T oyster sauce

3T soy sauce

72 wonton wrappers

1 egg yolk, beaten

Directions

In a food processor, combine the beef and egg white and grind to a paste.

Mix in the carrot, green onion, yellow onion, garlic, red pepper and the oyster sauce and soy sauce.

Lay 4 wonton wrappers out on a clean, dry surface, then place 1 Tablespoon beef mixture into the center of each wrapper. Wet all four sides with a pastry brush or your finger, then fold the bottom right-hand corner up the top left-hand corner and seal the edges, being careful to remove all air pockets. Transfer potsticker to a wax paper-lined baking sheet and press down gently to create a flat bottom.

Repeat with remaining wrappers and filling. Annoying!!!

To freeze: Place baking sheet into the freezer until potstickers are frozen solid. Transfer to a freezer-safe container or bag. When ready to eat, cook the same way as fresh.

To cook: Heat 1 teaspoon vegetable oil in a medium-sized skillet. Place potstickers, being careful not to crowd, into the skillet, getting oil on the bottom of each potsticker. Cook until golden brown on the bottom, then add enough water to come 1/3 of the way up the potstickers. Place a lid on top and let the potstickers steam for 2-3 minutes.

When there is just a couple Tablespoons water left in the skillet, remove the lid and allow the water to cook out and the potsticker bottoms to crisp back up. Use a spatula to gently unstick the wrappers from the skillet and serve with Au Jus dipping sauce (heat ingredients in a small saucepan or in the microwave.)

Serve as is or with chili-sauce-spiked soy sauce.

I don’t know how many wonton wrappers I originally had… I didn’t count and I ran out.  So I had to run out to the store.  The new ones seemed to work out quite a bit faster.  Don’t ask me why, but a trip to the grocery store when I had already been cooking for an hour was annoying!

Well I’m about to pull it altogether and serve Hubby his dinner.  Hopefully it all goes as planned. Wish me luck!

I’ll touch back later and add in some pics!

Tagged , , , , , , , , , , , , , , , , , , , , , , , , , , , , , , , , , , , , , , , , , , , , , , , , , , ,

PULLED PORK SANDWICHES

I wanted to make something easy tonight so I threw a pork roast in the slow cooker with some seasonings and such and voila…. dinner was served.  I put these ingredients together because I dislike BBQ sauce and hubby isn’t too fond of it either.   Worked out pretty perfect for me and any leftovers make for great lunch sandwiches cold too.

PULLED PORK SANDWICHES

5-6 hours in slow cooker on high

Ingredients:

Pork Butt Roast or Pork Roast

Salt & Pepper

Garlic

Chili Powder

Cumin

Crushed Red Pepper Flakes

2 cups Chicken Broth (low sodium)

1 cup Water

Dash of Worchester Sauce (optional)

Directions:

  1. Season roast with Salt & Pepper, Garlic, chili powder, cumin, crushed red pepper flakes
  2. Place seasoned roast in a ziplock bag and marinate overnight or for approx. 6 hours.
  3. place marinated roast in slow cooker.
  4. Add chicken broth, water and Worchester and cover with lid
  5. Cook in Slow Cooker for about 6 hours on High
  6. When roast is fully cooked and almost falling apart, remove from slow cooker place in a bowl to catch any juices, let cool and begin to pull the pork apart with your hands.
  7. Place pulled pork in shallow oven safe dish with lid
  8. The liquid left in slow cooker can be added to a pan and heated till most of the water evaporates and a nice dark rich glaze has formed.
  9. Pour glaze over pulled pork.

Serve on toasted kaiser buns with garlic butter and mayo

Tagged , , , , , , , , , , , , , , , , , , , , , , , , , , , , , , , , , , , ,

Mmm THICK n CHUNKY ~ Spaghetti My Way

Last night I had a sudden urge to go out at 9:00pm to buy a slow cooker.  I’d say ‘Crock Pot’ but that’s a brand like BandAid.  So I came home with a really nice slow cooker and today I wanted to put it to use.  I had a bunch of vegetables in my fridge (‘had’ being the key word as the fridge is void if vegetables now) and needed to get rid of them do I decided…. my Thick  n Chunky Spaghetti would be excellent!

Hubby and I like our spaghetti a certain way… think n chunky of course and filled mostly with yummy veggies.

For my spaghetti (can I even call it spaghetti when the pasta I use is Penne?), anyways, for my spaghetti I start it off with a giant stock pot on my stovetop.  Heat a small drizzle of olive oil in the bottom and add 1 diced onion, and 5 or 6 cloves of Red Russian garlic (or more or less depending on your taste buds, and if course u don’t have to use the Red Russian variety of garlic, that’s just the yummy goodness I had kickin round these parts LOL!) Sauté until the onions are translucent.  Then I removed them from the pit and set aside.

Then I browned my ground beef.  I think I started with 2 kgs?  What is that, like 4.5 lbs? Just under?  Once the beef is cooked thoroughly I drained most of the remaining liquids and added back in the sautéed onion and garlic and let it cook together for about 5 minutes.  Seasoning it with crushed red pepper flakes, cayenne, oregano and of course salt and pepper.

Ok next comes all the veggies…  I use approximately 2 cups chopped celery, 2 cups chopped carrots, 4 cups sliced mushrooms, 1 diced red pepper, 1 diced green pepper, 4 cups chopped broccoli and 2 cups chopped zucchini.  Add it all to the stockpot into the beef and onion mixture.  I cook this on low for about 10 minutes.  I want the veggies to get a bit seasoned and get em hot!

Next I add in 5-6 large cans of crushed tomatoes,  I like my sauce fairly thick and the veggies will produce a bit of liquid as well so make your best judgement.  Just don’t open all your cans of tomatoes until you know what you need.  Taste your sauce… usually it’s a bit acidic… add a pinch or two of sugar to cut down the acids.

Finally I add ½ cup of parmesan cheese.  It adds a nice bold flavor and helps everything bind together for a richer thicker sauce.

I put all this in my slow cooker and and it cooked for about 4 hours and then warmed for an hour.  I like it best after it’s cooled a bit and the flavours have blended.

It made about 7 quarts… I couldn’t even fit all of it into the slow cooker….  LOLOL  We will have spaghetti tonight and tomorrow and I will freeze the rest for a nice easy quick meal some other day.  Or share with a friend!


Tagged , , , , , , , , , , , , , , , , , , , , , , , , , , , , , , , , , , , , , , ,

ON TONIGHTS MENU ~ SHRIMP TACOS

I just posted 2 food blogs I figured I might as well put tonight’s meal on the board as well and make it 3 food blogs in one day.  I’m not sure why I’m in love with cooking these days but it’s become one of the fun parts of the day for me.  I’m always looking for something new for me to try and I’m storing all my recipes in a big binder so I can hold on to them forever.  Plus flipping through a book full of recipes that I’ve already determined would be a gooder is great for grocery shopping time and dinner time.

I’m actually made 2 different tacos tonight… the shrimp ones and then fish tacos, chopping up the fish and frying it the same as the shrimp, sub’ing the yogurt, cayenne, lime juice, cilantro, & salt dressing for a chipotle mayo.  I just mashed a chipotle pepper with some low fat mayo and added some of the adobe sauce from the chipotle can.  So 2 different tacos.  I’ve never made these before but they were SUPER SIMPLE just as the recipe claims.

I served them with guacamole & salsa on the side.  Hubby loves his guacamole!

SUPER SIMPLE SHRIMP TACOS

(source: http://cleananddelicious.com/)

Ingredients

1 lb of frozen shrimp, defrosted, peeled, & deveined

6 oz fat free Greek yogurt

¼ cup chopped cilantro

2 tbsp fresh lime juice

1/2 tsp cayenne pepper

½ a head of cabbage, thinly sliced (about 5 cups)

8 corn tortillas

4 tsp extra virgin olive oil

Salt and pepper to taste

Directions

  1. Heat tortillas over medium heat in a dry skillet until warm and starting to form small brown spots.
  2. Set aside on a plate covered with a clean kitchen towel.
  3. Mix yogurt, cayenne, lime juice, cilantro, & salt in a small bowl, set aside.
  4. Heat two teaspoons of olive oil in a medium non-stick skillet and add cabbage. Cook for about four minutes or until the cabbage is just barely wilted. Season with salt and pepper and set aside.
  5. Cut shrimp into thirds, so you have little bite size pieces. Sauté in two teaspoons of olive oil and season with salt, pepper and a dash of cayenne pepper over medium heat just until done. They cook up in just a few minutes… so be sure to watch them!
  6. Build your taco! Place a scoop of cabbage on the warmed tortillas taco, then top with shrimp, and cilantro sauce… enjoy!

Serves 4.

Tagged , , , , , , , , , , , , , , , , , , , , , , , , , , , , , , , , ,

ANOTHER SCHOOL YEAR ~ ANOTHER BAG LUNCH

  
I started this blog a few weeks ago for various reasons but I had no idea it would be used mainly to share yummy recipes with you…  I hope you don’t mind but here’s another… but it’s a gooder too!

The start of the school year reminds me of when I was in school… of course I can remember because it wasn’t THAT long ago geez… My mommy always put a lot of effort into our lunches, more specifically the snack or ‘treat’ part of it.  There was always something yummy and delicious that she had slaved over the night before…  My favorite, and a favorite of a few of my fellow classmates, was her Land O Lakes Glazed Apple Pie Bar recipe.  Like apple pie but better and you can hold it in your hand.  Once completely cooled it was just like candy!  She made these every so often and I’ve loved loved loved them.  If know me, you would know that I didn’t like food that much growing up… well not food just what it tastes like and their textures.  I was a picky eater that’s for sure but she couldn’t go wrong with these.

I made them a few nights ago in honor of the approaching school year.  Perhaps you have young children and would like to knock your kids socks off with these yummy bars in their lunch this year.   Or maybe you think it’s too much sugar… but if you do want to make them the recipe is below 😉


GLAZED APPLE PIE BARS

(source: http://www.landolakes.com)

60 min.prep time 1:45 total time

36 bars

Ingredients

Pastry

1 Land O Lakes® All-Natural Egg, separated, reserve egg white

1/2 cup milk

2 1/2 cups all-purpose flour

1 teaspoon salt

1 cup cold Land O Lakes® Butter, cut into chunks

Filling

1 cup crushed corn flakes

8 to 10 medium (8 cups) tart cooking apples, peeled, sliced

1 cup sugar

2 teaspoons ground cinnamon

1/2 teaspoon ground nutmeg

1 reserved Land O Lakes® All-Natural Egg white

2 tablespoons sugar

Glaze

1 cup powdered sugar

1/2 teaspoon vanilla

1 to 2 tablespoons milk

Directions

Heat oven to 350°F. Beat egg yolk in small bowl. Add 1/2 cup milk; mix well. Set aside.

Combine flour and salt in medium bowl; cut in butter with pastry blender or fork until mixture resembles coarse crumbs. Stir in egg yolk mixture with fork until dough forms a ball. Divide dough in half.

Roll out half of dough on lightly floured surface into 15×10-inch rectangle; place onto bottom of ungreased 15x10x1 inch jelly-roll pan. Sprinkle with corn flakes; top with apples.

Combine 1 cup sugar, 1 1/2 teaspoons cinnamon and nutmeg in small bowl. Sprinkle over apples. Roll remaining half of dough into 15 1/2×10 1/2-inch rectangle; place over apples.

Beat reserved egg white with fork until foamy; brush over top crust. Combine remaining cinnamon and 2 tablespoons sugar in small bowl; sprinkle over crust. Bake for 45 to 60 minutes or until lightly browned.

Combine powdered sugar, vanilla and enough milk for desired glazing consistency in small bowl. Drizzle over warm bars.

  
– If pastry dough does not form a ball easily, add up to 1 tablespoon additional milk, 1 teaspoon at a time.

– To easily transfer pastry to jelly-roll pan, fold pastry in half; fold in half again. Place folded corner at center of pan. Unfold pastry carefully.

– Top pastry should be rolled on lightly floured surface slightly larger than bottom pastry to allow pastry to cover filling easily.


Tagged , , , , , , , , , , , , , , , , , , , , , , , , , , , , ,

BAKED TURKEY & SPINACH MEATBALLS ~ Who doesn’t love a good meatball?

I recently purchased some lean ground turkey meat and I wasn’t sure what I was going to do with it at first… a girlfriend of mine started eating healthier and one of the things she did was eat alot of turkey…  well she looks great so I figured if I had it in my kitchen, I’d have to find someway to eat it…  I searched online and found a yummy little recipe perfect for my lean ground turkey meat.

BAKED TURKEY & SPINACH MEATBALLS

(source: http://homecookingmemories.com/)

Ingredients

  • 2 tablespoons olive oil
  • 1 large onion, finely chopped
  • 2 garlic cloves, finely minced
  • 1 teaspoon salt
  • 1/2 teaspoon ground black pepper
  • 1/4 teaspoon dried thyme leaves
  • 1/2 teaspoon dried oregano
  • 1/4 – 1/2 teaspoon crushed red pepper      flakes (optional – adjust to your preference)
  • 16 oz frozen chopped spinach (defrosted,      drained, and squeezed to remove excess water)
  • 2 tablespoons Worcestershire sauce
  • 1/3 cup chicken broth
  • 2 1/2 lbs lean ground turkey
  • 3/4 cup bread crumbs
  • 2 large eggs

Instructions

  1. Preheat oven to 400 degrees F. Prepare a large baking sheet by spraying with cooking spray. I actually line my baking sheet with foil and then spray with cooking spray.
  2. In a frying pan on medium heat, heat olive oil until hot. Then add onion, garlic, salt, pepper, thyme, oregano, and red pepper flakes. Sauté until onion is tender (about 5-6 minutes total time).
  3. Add spinach to pan and combine with onion mixture. Add Worcestershire sauce and chicken broth and mix well to combine. Cook until most of the liquid has cooked out (evaporated). I don’t have much liquid in my pan after I combine all these, but it will depend on how well you drained your spinach. Remove from heat and allow to cool to room temperature.
  4. In a large bowl, combine the turkey, bread crumbs, and egg. Add cooled onion/spinach mixture to the meat. I do all of this step with my hands, but you can use a spoon if you prefer.
  5. 5. With your hands, create meatballs that are about 1 – 1 1/2 inches in diameter and place them on the baking sheet. Leave a little bit of space between each meatball. When you are done shaping your meatballs, you will probably have about 40-42 meatballs from this recipe. Don’t need that many? Freeze them after baking or cut this recipe in half (but I say freeze them and then you’ve done the work only once and have a future meal).
  6. Bake until your meatballs are cooked through with an internal temperature of 160 degrees F – which was about 20 minutes for my oven. Remove from oven and serve as desired.

Oh my gosh, they were soooo good.  I made them bigger than the recipe calls for and so of course it didn’t make as many but I found them to be a bit more moist this way.  Turkey doesn’t have as much fat so I didn’t want my meatballs to be dry.  You also get your vitamins from all the spinach!   I just love spinach and I’m so glad hubby likes his greens too!

Mmmmm, if you are looking for a meatball fix, or if you are wanting a different little appy for your upcoming party… these little morsels will be a hit!

If you make them, please let me know what you think!

Tagged , , , , , , , , , , , , , , , , , , , , , , ,